Friday, 23 January 2015

Blue Apron Test Run


Hi Everyone! I realize that i've been bad about posting this week - work is increasingly crazy and i'm playing with how often these posts should go out, to ensure quality over quantity. In any case, my Christmas present from the boyfriend was two weeks of Blue Apron (thank you boyfriend!) and i've been having a blast playing with the large boxes of ingredients that show up on my doorstep every Tuesday night.


The idea is that you get a chilled box of ingredients for 3, 2 person meals per week. The delivery is once a week and the box is surprisingly small for holding a substantial amount of food.


You get a chance to select your dietary preferences and delivery day/time before the order is placed and each week, a lovely letter and three recipes, with step-by-step instructions come along with the food.


This recipe was for spiced, banana leaf wrapped cod. The directions were precise, simple, and corresponded cleanly with a list of ingredients on the other side of the sheet. *Blue Apron also provides a helpful picture of the ingredients to be used in each dish, so don't worry that you might not know what Kohlrabi looks like or that you'll get everything they sent mixed up and use the wrong ingredient.  Along with the fresh produce and packaged meat (in a separate compartment, surrounded by ice packs), there are sealed, brown paper bags of "nick-naks"for each meal. These contain everything from dried spices to coconut flakes and ghee.


 Going back to my spiced, banana leaf wrapped cod, the cooking time and preparation directions were accurate and I enjoyed some quiet time in the kitchen doing the small amount of prep work required, before sitting down to a lovely meal.


Thoughts on Blue Apron:

Pros: This is a great service for someone who has very little time on their hands and would like to cook if the ingredients could magically appear when needed. You do get three meals at once, so even if you're not going to eat it within three days, it should all be cooked and frozen before the produce turns (something I found myself doing with all three meals, the night before a long weekend out of town). The ingredients are fresh and of good quality and the recipes are great for the most part. 

Cons: That said, the drawbacks for me are: my life is pretty hectic, so having to cook on a set schedule is not something I can always do; part of the gimmick is that they provide you with absolutely everything you will need to cook a certain dish - this is not entirely true however as they do leave out things like olive oil, salt, and pepper (that's fine for me but if you have absolutely nothing to cook with in your apartment, then their assumption that you have these basic tools is going to be a problem); the brown paper nick-nak bags are a great way to compartmentalize the small stuff but if one of them needs to be refrigerated, I wish they would say so on the label for those of us who are inclined to leave it on the counter for a day or two; lastly, while I LOVE the chicken, pork, and beef recipes, the two fish ones i've tried thus far were bland and not something I would make again. 

Barring the fish, it was a great experience and I would recommend it if you're looking for a way to spice up your cooking.

Friday, 16 January 2015

Caramel Whiskey Sauce

Happy Friday! Going to any parties this weekend and suddenly remembered that you need a hostess gift STAT? Look no further! In a similar (the exact same) situation, I whipped up this recipe in about 10 minutes. Given a few hours to cool, you'll have a delicious, party ready sauce to go with any dessert (or lick off the spoon).


Place a medium sized pot over a low heat and add all of the ingredients except the whiskey. Stir constantly until the mixture is melted and combined. Turn the heat on medium-high, bring to a boil, and lower the heat slightly, boiling the mix for 3 minutes. *This gives the sugar, cream, and butter time to mix and start to candy but keep an eye on the heat - if it's too high, everything will start to separate and burn to the bottom of the pan.

Removing the pot from the stove, add the whiskey, stirring constantly as the mixture will boil back up with the addition. Let the sauce cool slightly, pour into individual (or one large) jars, and place in the fridge for 1-2 hours or overnight if possible. *Don't worry that it is super runny, the sauce will be thicker, the colder it is and can alternatively, be warmed up to achieve a thinner consistency. Enjoy! 

Ingredients:

- Butter, unsalted - 1
 c
- Sugar, light brown - 2 c

- Heavy cream
 - 1 c
- Salt - 1/8 tsp
- Whiskey - 1/4 c


Makes four 5-ounce jars

Wednesday, 14 January 2015

Funfetti Cupcakes with Chocolate Ganache


My little (but very grown up) sister's birthday was last week and every year, she asks for the same cake: funfetti. She loves this timeless combination of white cake and sprinkles so much, that she's only half-jokingly said that it will probably be her wedding cake one day. My mom is horrified at this idea but I think it's splendid.

In honor of her funfetti obsession, I pulled two recipes out of storage that I have been dying to try, by Molly Yeh. The first, is a two layer funfetti cake, which she thoroughly tested and re-tested until she had the perfect, from scratch white cake mix with an excellent sprinkle to crumb ratio. The second, is a scrumptious chocolate ganache from another recipe, poured over a pistachio cream cake. 

I loved both of these ideas and wanted a more portable dessert option for my sibling, who would no doubt encounter way too many cakes over the week. So I opted for the cake recipe, poured into cupcake tins and topped with the chocolate ganache.

My sister says that the result combines the "tastes of a 4 year old with a grown up, sophisticated frosting." So thank you Molly for all of your test runs that made possible a funfetti creation that even the most reserved person can eat without losing face!

To make the cupcakes:

Preheat oven to 350 degrees Fahrenheit. Set out 3, 12 cup tins, lined with paper cups.

In a medium sized mixing bowl, cream the butter and sugar until combined and fluffy. Add the eggs whites, one at a time, combining each one into the batter. Then, add the vanilla and oil.


In a separate, smaller mixing bowl, combine the cake flour, baking powder, and salt. Add this to the butter and sugar mixture in three parts, interspersed with the whole milk. 


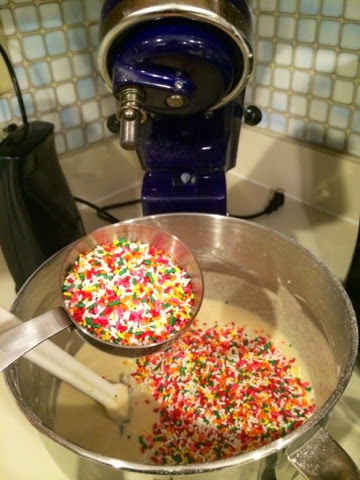
Fold in 1c of the sprinkles.


Using a soup spoon or 1/3 c measure, pour the batter into the cupcake tins, stopping after each tin to wipe up any spilled batter. 


Once the batter is evenly dispersed in the cupcake tins, sprinkle 1/2 c of the remaining sprinkles on top of the batter in each cup (this is important, read here for Molly Yeh's test results on how to perfect the sprinkle presentation). Place in the oven and bake for 25 minutes or until a knife inserted into the center of a cupcake comes out clean.


Let cool completely. *Now is a good time to make the frosting!

To make the chocolate ganache:

Prepare the chocolate and set aside in a heat proof bowl.

Place the heavy cream in a small saucepan over a medium heat, stirring occasionally. When the cream starts to bubble around the edges, remove from heat and pour over the chocolate. Stir constantly until the cream and chocolate have melted into a thick, smooth mixture. Spoon 1/2 tbsp onto each cupcake, going back to fill in the tops with the leftover ganache as needed. Sprinkle the remaining 1/2 c of sprinkles over the frosting and let sit for 2 hours or overnight if you can as the frosting will harden.


Ingredients:

Filling:

- Butter, unsalted - 1 c, room temperature
- Sugar, granulated - 1 1/2 c
- Large egg whites - 4
- Imitation vanilla (McCormick's is suggested) - 2 tbsp
- Vegetable oil - 6 tbsp
- Cake flour - 2 1/2
- Baking powder - 2 1/4 tsp
- Salt - 3/4 tsp
- Whole milk - 1 c
- Sprinkles - 2 c (the original recipe calls for less but I am a gratuitous sprinkle user)

Frosting:

- Semisweet chocolate - 8 oz, chopped
Heavy cream - 1/2 c

350 degrees Fahrenheit
Bake for 25 minutes
Makes 30 cupcakes

Monday, 12 January 2015

Vegetarian Enchiliadas

Hungover from your Golden Globes 2015 party? Because I am. Too many bottles of champagne later, I am SO glad that I made these enchiladas yesterday, they're the perfect comfort food AND they're healthy!

I had volunteered to make a casserole-esque dish for the GG party earlier in the week and one bad cold later, I finally dragged myself to the store, two hours before the party and frantically stared at the shelves for inspiration. I remembered my mom's enchiladas being delicious, filling enough for a crowd of people, and not that hard to make, so I called her for the recipe.Thanks to my awesome mom, I served a modified (for vegetarians) dish that was a hit with everyone and made an entire pan of leftovers for the round of hangovers we are all experiencing today.


Start your enchiladas by chopping up the garlic and onions, slicing and cording the bell peppers, and adding all of them to a large sauce pan over medium-high heat, with the butter. Stir until the butter has evenly coated the bottom of the pan and the vegetables, then cover and let sit for 5 minutes, stirring occasionally. *Check to see that the onions are caramelizing not burning as they cook and turn the heat down slightly if burning.


Place the rinsed corn and black beans in a small mixing bowl and put half of the mixture in a large frying pan over a medium-high heat. *Don't use any butter to grease the pan. The secret to great enchiladas is in the proper preparation of the stuffing and a key ingredient should always be roasted corn and black beans. Making sure that the mixture is spread flat on the pan, season it with 1/2 tbsp of: cumin, chili powder, garlic, onion, and a few pinches of salt and pepper. Wait 1-2 minutes before flipping the mixture over, then season and repeat until the corn kernels show darker, burnt looking patches. Pour this mixture into the larger pan where the bell peppers, onion, and garlic are sauteing, repeat step one with the corn and black bean mix, and add it to the larger pan.


Once everything is in the sauce pan, add 1/2 cup of the salsa, stir, and season to taste with as much cumin, chili powder, garlic, onion, salt, and pepper as you like. Remove from heat when you are happy with the spice level.


Grab the tortillas and lay one flat in a 13 x 9 pan. Place a scoop (1/2 -3/4ths cup size) on one edge, sprinkling it with a light coat of shredded cheese, and roll up the tortilla, placing it seam down in the pan. Repeat this process until the pan is full - about 6 tortillas per pan. 


Once the pan is full, spread 1 cup sour cream over the top, evenly coating the tortillas with special attention given to the edges so they don't burn. Repeat this with 3/4th cup salsa, and coat with 1 - 1 1/2 cups shredded cheese. Preheat the oven to 350 degrees Fahrenheit.


Cover the dish with aluminum foil and place in the oven for 30 minutes. At the 30 minute mark, take the foil off and place back in the oven to finish cooking for another 10 minutes. Remove from the oven, cool slightly, cut down the center, and serve casserole style with additional salsa and sour cream.


Our GG party was a smorgasbord of foods and wine from all over: a girlfriend who just got back from Italy brought mounds of cheese and boar sausage, another one brought wines from Spain, and yet another brought two different types of champagne, topped off by my vegetarian enchiladas. As a dinner menu, it sounds like a nightmare but given a strong red wine to string everything together, it was perfect.


Ingredients:

- 1 Red bell pepper
- 1 Green bell pepper
- 1 Orange bell pepper
- 1 Yellow bell pepper
- 1 Spanish onion (Vidalia will work as well)
- Garlic - 3 cloves
- Butter, unsalted - 2 tbsp
- Corn - 2 8 oz. cans
- Black beans, rinsed - 2 16 oz. cans
- Cumin - 2 tbsp
- Chili powder - 2 tbps
- Garlic - 2 tbsp
- Onion - 2 tbsp
- Pepper - 1 tbsp
- Salt - 1/2 tbsp
- Shredded cheese - 2 8 oz. bags (mixed or sharp cheddar and mozarella, which is what I used)
- Flour tortillas - 15 large
- Salsa - 1 jar
- Light sour cream - 1 jar

- 2 13 x 9 pans

350 degrees Fahrenheit
40 minutes
Makes 2 13 x 9 pans

Friday, 19 December 2014

Bacon Wrapped Dates

Goat cheese stuffed, bacon wrapped dates!
Hi Everyone. First off, I know i've been out of the loop and on radio silence since last Friday but I promise that I was not abducted by aliens or mythical creatures of yore (how cool would that be though?). The past weekend/week have been a non-stop slew of entertaining, obligations, and a crazy amount of work, all packed in right before I leave for Texas this afternoon. I've been away from my kitchen and re-discovering the instant foods aisle at my local Duane-Reade (cringing as I type this) but luckily, last night's party included real food and one of my absolute favorite party tricks made a surprise appearance.

Not only are these easy to make but there are endless ways to make them, depending on your taste AND they include bacon. What's not to love?

For the two variations discussed here, you will need: pitted Medjool dates, bacon (I prefer thick cut, applewood smoked), and either pecans or honey, depending on your preference.

For pecan stuffed dates:

Preheat the oven to 400 degrees Fahrenheit. Stuff half a pecan in each date, inserting in the whole created by the removal of the pit, and wrap in 1 or 1/2 piece of bacon, depending on what kind of bacon-to-date ratio you want. *Note - the bacon will shrink slightly as it cooks, so make sure it has a good overlap. Secure the bacon wraps with a toothpick, going cleanly through the date.

For honey glazed dates:

Preheat the oven to 400 degrees Fahrenheit. Using a basting brush and a bowl of honey, brush each date with a light coating of honey and wrap with 1 or 1/2 piece of bacon. Secure with a toothpick, going cleanly through the date, and see cooking directions below.

For both recipes:

Place the bacon wrapped dates 1/2 inch apart on a cooling rack or dripping pan over a shallow, rimmed pan (I make a shallow lipped pan of aluminum foil, place that on a baking sheet, and put the cooling rack over that). Place in the oven for 15 minutes, checking the dates around the 10 minute mark to make sure that they are cooking fully (may need to be turned) and not sitting in any bacon juice (hence, the need for an elevated cooking surface). After 15 minutes, keep cooking the dates until the bacon is at your preferred level of crispiness for up to another 5 minutes.

Let cool slightly and serve with the toothpicks still in them so people can pick them up.

Ps. I had these stuffed with goat cheese last night and would highly recommend doing that in place of the pecans if you're nut averse.

Ingredients:

- 20 pitted Medjool dates (the size of this recipe is completely subjective/based on how many people you are serving but always plan to make double what you need as these will all be eaten in 5 seconds!)
- 1/2 lb bacon (preferably thick cut, applewood smoked)
- 1 c pecans or pecan pieces
- 1 c honey

- toothpicks
- basting brush
- cooling rack or drip pan

Serves 10-20

Wednesday, 10 December 2014

Sundried Tomatoes and Baby Bella Mushrooms in a Dijon Beurre Blanc

I've had a tin of sundried tomatoes staring at me from the cupboard for over a month now. I keep meaning to use them, keep forgetting to, and they keep staring back in the most judgmental fashion. I haven't eaten much 'real' food lately due to the holiday rush, so last night, I finally broke down and pulled the tomato tin off the shelf, intent on cooking something instead of reaching for a handful of goldfish and a sugar cookie.


I decided to do a beurre blanc sauce and throw in some baby Portobello mushrooms that needed eating but I generally prefer them marinated in something prior to cooking and I can't stand a cold, coagulated beurre blanc, so that was out. Instead, I whipped up a marinade of dijon mustard, garlic, salt, pepper, dried rosemary, and a bit of water to liquify the mixture a tad. Mixing that with the mushrooms, I set it aside to chill in the fridge for an hour and a half, while I went for a run.


Once back in the kitchen, I put a pot of water on high heat, letting it come to a boil before adding half a package of fettucine. The I pulled the mushrooms out of the fridge, placed them in a pan over medium heat with a tablespoon of butter, and covered to let simmer for 3-4 minutes. Once the mushrooms start to soften, add 6 chopped, sundried tomatoes, another tablespoon of butter, and cover for another 2 minutes. The marinade will start cooking off around the 2 minute mark, which is where you add the sugar, another 2 tablespoons of butter, and 1/2 cup white wine vinegar. Mix and let simmer until the sugar is melted. At this point, you have a lovely Dijon Beurre Blanc sauce and can tweak depending on personal preference (more sugar, more vinegar?). Strain the cooked pasta (it will be done around the same time your sauce is), add to the sauce, and enjoy!


Ingredients:

- 1/2 box fettucine
- 15-16 baby Portobello mushrooms
- 4-5 tbsp dijon mustard
- 1/2 tsp salt
- 1/4 tsp pepper
- 1 tsp garlic
- 1 tsp dried rosemary
- splash of water
- 4 tbsp butter, unsalted
- 6 sun-dried tomatoes
- 1 tbsp sugar, granulated
- 1/3rd c white wine vinegar

Serves 2

Monday, 8 December 2014

Cranberry Orange and Vanilla Sugar Cookies


Yesterday, I played the game of what's in my pantry that I can turn into a cookie? I use this 'technique' to take stock of my baking supplies, use up any niggling leftovers, and justify not leaving the house for groceries when it's 20 degrees outside.

The ingredients I turned up were: cranberries, dried coconut flakes, and clementines. I figured that those made sense as a cookie, so I did some research and found this recipe, which I think is actually from a butter company (mildly hilarious). I loosely based my cookies off of this and the result was a delightfully light cookie with hints of orange, vanilla, and a tart cranberry bite to offset the sea of rich desserts popular right now.


To start: pre-heat the oven to 350 degrees Fahrenheit and cover a cookie sheet with aluminum foil or parchment paper and set aside. In a large mixing bowl, combine butter, sugar, orange (or clementine) peel, and vanilla until smooth. Add in the egg, repeat, and set aside.


In a smaller bowl, mix flour, salt, and baking soda. Add this into the larger bowl in stages, mixing it in a little bit at a time. Lastly, add in the dried coconut and cranberries (*I always coat these in a light dusting of flour first to make sure they don't sink in the batter). If you're using an electric mixer, it will cut up the cranberries for you, otherwise chop roughly before adding. Once thoroughly combined, set aside.


Pour some sugar into a large bowl to roll the cookies in. I used a jar of vanilla flavored sugar that I made earlier, in this recipe to give them a lovely, floral finish.


Going back to the dough, roll out 1 inch cookies, coating them in the sugar, and place 1 inch apart on the baking sheet. Bake for 15 minutes, let cool, and enjoy!


Ingredients:

- 3/4th c butter, unsalted
- 1 1/4th c granulated sugar
- 1/2 tbsp grated orange (or clementine) peel
- 1 1/2 tsp vanilla
- 1 egg
- 1 1/2 c flour
- 1/2 tsp baking powder
- 1/8th tsp salt
- 1 c cranberries
- 1 c dried coconut flakes (if sweetened, use only 1 c sugar and 1 tsp vanilla)
- 3/4th c granulated sugar for coating

Bake at 350 degrees Fahrenheit for 15 minutes
Makes 24 cookies

Friday, 5 December 2014

Christmas Cookie Roundup

Every year, my family hosts a holiday party and every year, I get in either the day before or the day of; sometimes even 3 hours late FOR the party (only happened once fortunately). Most years, I also help out with the preparations/baking and while I am getting in the evening before this time, I still have to bake enough to feed a large number of people in under 24 hours.

Before you empathize and panic, i'll admit that this isn't nearly as high stress as it sounds, so long as you have a good set of recipes that are 1) simple and 2) still unique and decadent enough to wow even the most frost-bitten soul. With that in mind, i've rounded up my five favorite recipes of the season, all of which are nearly impossible to mess up and are suited to sate a wide variety of palates. Bon appetite and happy baking!


 These peanut butter blossoms from Saveur are a standby classic for me and while not everyone loves a peanut butter cookie, something I will never understand, the simple addition of a hershey kiss or a dollop of tempered chocolate reinvents them just enough to bridge the gap between 'eeew, peanut butter' and 'oooh chocolate!'


Annie's Eats never lets me down when i'm looking for an inventive take on a classic or a unique taste and presentation that blows everyone away without breaking the bank on ingredients. True to form, these creamy eggnog cookie bars do not disappoint. I know that not everyone loves eggnog, in fact I think you could split a room in half by asking that question but for those of us that do, this is a welcome respite from the overly decadent chocolate truffles, fudges, brownies, and cheesecakes that populate the season. It's like a blondie but with eggnog, which is like already having a perfect 10 on your Olympics figure skating routine and then getting an 11! You get the point now be adventurous and try them!


This breathtakingly beautiful white chocolate peppermint cookie with vanilla salt comes from Food52, another one of my favorite sites for a fun recipe with a slightly more sophisticated edge. Yes, we're all grown ups but does that mean we can't have fun smashing candy canes to bits and putting them in cookies? Of course not.

Ok, so these sugared cranberries aren't technically a dessert or baked good but just THINK of how beautiful they would look resting on the top of a dark chocolate fudge cake, iced in a thick, white buttercream. Alternatively, you can eat them like candy - "natural sour patch kids" as love & olive oil puts it. I've used these in scones and then frozen the leftovers to be defrosted and used in a creamy cheddar cheese dip two weeks later, so don't worry about what you're going to do with them, just try them!


Just looking at this raspberry chocolate bread pudding makes me want to curl up by the fire and sing Christmas carols while eating my weight in chocolate. Two Peas and Their Pod is one of my all time favorite blogs. They have an adorably mixed sense of style and whimsy that lends itself perfectly to surprises like this decadent bread pudding, balanced by bright, fresh raspberries. I'm thinking that this will be on the table Christmas morning in place of my traditional cinnamon rolls and just maybe, the raspberries will save us all from a food coma later in the afternoon.

Wednesday, 3 December 2014

Drinking Games and Puppy Chow


When my friend asked me if we could play a drinking game based on Love Actually, (on the pretense that I could use it to blog about) I said yes before she could finish the sentence. Of course, any good game needs a killer snack to balance out whatever libation is thematically appropriate.

http://www.buzzfeed.com/leonoraepstein/this-love-actually-drinking-game-is-the-best-time-ever

To accompany the evening's lineup of cab-sauvs (my favorite), I pulled a childhood favorite out of the archives and made a simple but oh so tasty, giant bowl of puppy chow.

You know how much I love simple recipes and this one is more of the same:

Measure out 7 cups of rice chexs in a large mixing bowl and set aside.


Melt butter, chocolate chips, and peanut butter together in a pot over medium heat, stirring constantly to avoid the chocolate burning or separating.


One melted, add to the large mixing bowl and gently fold with the chex until they are evenly coated. *The recipe will coat almost all of the cereal you've got but start out with 7 cups and add additional as needed.


Once mixed, set aside and prep a double layer of large ziploc bags with the tops folded back to stay clear of the chocolate-peanut butter goo. Scoop half of the rice chex mix into the double layered bag, top with 2 cups powdered sugar, seal, and shake until the chex are completely coated in the sugar.


Place in a clean serving bowl and repeat with the last half of the mixture.

Now you're done and ready to enjoy a childhood-esque sugar rush!


Ps.This was a great game, great snack, and we're planning to follow up with a Holiday version!

Ingredients:

- 1/2 c butter, unsalted
- 1 c chocolate chips (mini-semisweet Gihrardelli will melt faster and be easier to work with)
- 1 c peanut butter (Jif creamy is my go to but any classic PB - no organic or natural - will work)
- 7 c Rice Chex 
- 4 c powdered sugar

- 1 large mixing bowl
- 1 pot
- 2 large Ziploc bags
- 1 soup ladle or large serving spoon


Monday, 1 December 2014

Cream Cheese, White Cheddar, Cranberry Dip


Standing on the subway platform for work this morning, I was struck by just how much I needed the Thanksgiving break as a chance to do absolutely nothing.

I read all of the new recipes for Christmas cookies and am super excited to take part in the season's baking frenzy but first? I needed to sit on the couch all day, watching Star Trek re-runs, eat chocolate-pecan pie for breakfast, and find out what it feels like to not go outside for over 24 hours because my boyfriend was nice enough to take out the dog. 

I plan to start my Christmas baking this weekend but there are leftovers (and LOTS of wine) to be worked through first. The winners and consequentially 'least leftovers available' from this past weekend are: pulled pork, chocolate-pecan pie, and the most surprising dish of Thanksgiving: melted cheesy-cranberry dip.

I've said previously that I am not the biggest fan of cranberries but now I realize that, that only applies to sweet dishes. This savory recipe on the other hand...is perfection.


This dish requires 4 things: cranberries, cream cheese, aged white cheddar, and a ramekin (or Italian pottery equivalent as was my case). Once you have those? Pre-heat the oven to 375 degrees Fahrenheit, mix the cream cheese and shredded cheddar, fold in the cranberries, and place in the ramekin to bake. I'm not kidding, it's that easy.

Give the mix 30-40 minutes and take out when it is browned around the edges and starting to bubble. Serve hot with crostini and enjoy!

Lessons learned: always make at least a double batch because this will be gone in 5 minutes.

Ingredients:

- 8 oz cream cheese
- 4 oz aged white cheddar, shredded
- 1 c cranberries 

- 1 ramekin 

Friday, 28 November 2014

Pulled Pork!/Thanksgiving-Christmas Transition

Happy Thanksgiving and Merry Christmas to you all!
My household celebrates today by figuring out how to store all of yesterday's leftovers while transitioning to the Christmas season with lights, a mini-tree, and a sleigh bell for the dog that is already driving my boyfriend crazy.

Our Thanksgiving feast; Course #2
Given the food hangover we all have, cooking will be minimal and meals will include sneaking bits of the chocolate-pecan pie (omg you guys, SO good) and eating pulled pork sliders - also leftover based.

I opted for pulled pork because I am one of the few who doesn't like turkey and opts for a more Southern alternative but it's also a great dish to throw in the crock pot and come back to hours later.

To start: Place a 2lb, boneless pork loin in a 3.5-5qt crock pot, poke it full of holes with a fork (do this on all sides), rub with salt and pepper, and slather with 3 cups of your favorite barbecue sauce. I chop up some garlic and onions to sprinkle over the top, along with an even coating of brown sugar.


Place the crock pot on 'low' and leave for 5 hours. Check on the pork loin at 5 hours - it should be a bit tough and a whitish-pink on the inside. Some of the fat should have also melted off, forming a thin sauce with the cooked vegetables, brown sugar, and bbq sauce. Ladle this over the pork loin and let cook for another 3-4 hours, checking it every hour. When it's done, large chunks should easily fall away when plied with a fork.

At this point, take the pork loin out of the crock pot (don't turn off) and place on a large cutting board to pull. You can pull the pork by hand (old school style) or use two forks to pull and shred the pork. Set aside when done.

Turning your attention back to the crock pot - use a sieve to strain the mixture of fat and bbq sauce into a medium-large pot and set aside.

Place the pulled pork back in the now empty crock pot and cover with an additional 2 cups bbq sauce and a few tablespoons of the sauce you just strained. Mix and turn the crock pot setting to 'warm.' This will let the pulled pork continue to soak up the bbq sauce mixture while not drying it out.


I give it another hour or two from here, based on how much time you have but you can let it sit for as little as 30-45 minutes and serve.

*Remember that sauce you strained and put aside? Place the pot over medium-high heat, whisk in 2 tbsp butter, and equal parts flour and water (starting with 1/3 c of each). The mixture will thicken as you whisk and you may need to add another tbsp or two of water, depending on how thick you want it. Once done, remove from heat and serve with the pulled pork as gravy.

Plate with some toasted bread and maybe a bit of leftover mash and enjoy!

Ingredients:

- 2lb boneless pork loin
- 3 c bbq sauce (homemade or Jack Daniels honey bbq)
- salt and pepper to taste
- 1/2 large, sweet onion, chopped
- 4-5 garlic cloves, minced
- 2 tbsp dark brown sugar
- 2 c bbq sauce (same as above)

Gravy:

- strained sauce
- 2 tbsp unsalted butter
- 1/3-3/4 c AP flour
- 1/3-3/4 c water 

- 3.5-5qt crock pot
- large sieve
- cutting board